In My Kitchen
Recipes on this page:
Tomato Basil Soup
Chicken Soup Buttermilk Biscuits Butter Bread Yogurt Whipped Cream Spiced Oatmeal Muffins Chocolate Muffins Mom's Chocolate Chip Cookies Hot Cocoa mix |
|
Tomato Basil Soup

tomato basil soup
Melt 2 cubes butter (1/2 lb +/-) in a large stainless steel pot on medium heat being careful not to brown. (ok, try not to brown it, but it's not the end of the world if you do). I have used butter that my daughter made and before she had a chance to wash or salt it.
Chop 6 large onions and add to the butter. Crush 6 garlic cloves and add. Cook in butter till softened, then add 9 lbs chopped, cored and peeled tomatoes (I never peel or core). Cook a few minutes till softened.
Add sea salt according to taste (a couple of tablespoons +/-), and a tablespoon or so of sugar. Add 3 or 4 tablespoons (to taste) of basil leaves, for fresh add more, and for dried add less.
Then add half gallon chicken broth (if you have it, water if you don't) and a half gallon of water. Simmer 20 minutes.
Run through your blender (if desired) for a pureed effect. I usually run about half the soup through it and leave the other half for a chunky soup.
Makes 3 gallons or so... enough to can (using a pressure canner) 7 quarts for eating later, plus have a meal or 2 now.
This recipe is flexible according to taste. Try a number of different herbs for different flavors. If you don't have some of the ingredients, substitute something else.
Also, look up canning information if you're interested in canning this soup for the newest USDA information. I canned it in quart jars for 75 minutes at 15 lbs pressure in a 22 quart pressure canner.
Chicken Soup

photo coming
1 whole chicken cleaned, skinned (optional), boiled, then deboned
salt and pepper to taste
a gallon of water
carrots -fresh or dried
celery -fresh or dried
peas (optional)
potatoes
onions -fresh or dried
poultry seasoning
garlic -fresh or dried
More to come on this recipe, It's late and I'm tired.
salt and pepper to taste
a gallon of water
carrots -fresh or dried
celery -fresh or dried
peas (optional)
potatoes
onions -fresh or dried
poultry seasoning
garlic -fresh or dried
More to come on this recipe, It's late and I'm tired.
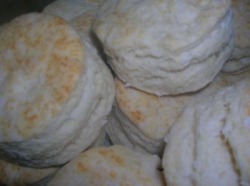
Buttermilk Biscuits:
buttermilk biscuits
4 cups flour
2 TBSP baking powder
1 tsp salt
1 cup shortening, or 1/2 cup coconut oil, or 2/3 cup cooking oil (or a combination of these items, depending on what you prefer and what you have on hand)
1 1/3 - 1 1/2 cups buttermilk (or milk, or even water if that's all you have)
Put dry ingredients in a large mixing bowl.. If using shortening cut it in with a pastry cutter, fork or even the side of your spoon. Add buttermilk (milk or water). Stir well and knead a few times(but don't overwork it as it will make tough biscuits) till it makes a soft dough and will roll out easily on a floured board. Roll out to desired thickness. Thinner (1/4 inch) makes for a good reasonable biscuit. Thicker (1/2 inch) makes a nice fluffy tophat biscuit. Cut with a biscuit cutter, glass, or a cup. Place them on ungreased baking sheet ... then roll out remaining dough and form more biscuits till you've used up all the dough.
Bake at 450ºF for about 12 minutes till light golden brown on top. Remember that they brown a little more after removing from oven.
Homemade butter and jelly is delicious with these!
Butter:
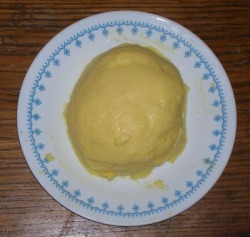
homemade butter
You haven't an idea of what real butter is until you've tasted a good homemade butter! The supermarkets can't even come close! The butter milk was used to make baking powder biscuits and pancakes that were awesome! I also whipped up some of the cream to put on strawberries and a homemade cake.. DELICIOUS! No "COOL WHIP" necessary...lol
No, I don't have cows or goats (YET). A friend gave us some cow's milk and I dipped the cream off and made butter from it. By the way, the milk actually has FLAVOR to it.... the way milk SHOULD taste!
~~~
To make butter, we filled a 3/4 gallon pickle jar about half full of cream, put the lid on tight, and shook it and shook it and shook it some more. We passed the jar around while watching an old movie and before the end, we had BUTTER! Next we drained off the buttermilk into another container to save, placed the butter on a breadboard and pressed it out, then making a ball, then pressing again while occasionally rinsing it off with COLD water, so it doesn't melt and run down the drain. We kept up the pressing, forming a ball, then pressing again, until the rinse water came off clear. Then we worked in salt til it tasted right.
We found out that if the cream is too cold, it takes longer to turn.. and if the cream is too warm, it takes longer to turn. It works the quickest if the cream is about 60º or so. It will turn to butter at colder or warmer temps, it can just take longer.
Now I better get that bread made, huh?
Below is a recipe for using the buttermilk in biscuits... now those are gooooood! Our daughter makes the highest, fluffiest and best biscuits I've ever had!
Bread:
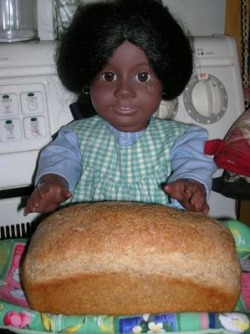
doll is American Girl Addy
Whole wheat kernals before ground into something are called wheat berries. 2 cups wheat berries weigh just about a pound. I have a WhisperMill for grinding wheat berries into an nice fine flour. This is what I use most of the time. But I also have a Bell grain mill for use with muscle power rather than electric power. It doesn't produce the finely ground flour the WhisperMill does but I've made plenty good enough bread with flour ground with it. My husband has built muscle grinding enough flour for bread, too ;)
I also have a Bosch machine for kneading the dough to a just right consistency, but I can do it by hand when necessary. It's harder on the wrists for those, including me, with wrist problems but it comes out fine and tastes just as good, though the consistency is a bit courser.
Several years ago, I started out making bread with a recipe which I have altered many times. I will try to give a basic recipe here so that you can alter it, add to it, change it, however you want to get the desired result.
~~~
Put 6 cups warm water in a large bowl (or the Bosch kneading bowl) and add 1/3 cup oil. I've used several different kinds of oils: olive, canola, coconut, and others. They all do the job. So use what you have or can afford. Add 1/3 cup honey or molasses. Molasses gives a darker, richer bread. Either honey or molasses is delicious!
Then add 3 tablespoons of active dry yeast. I use the bulk type yeast out of a 2 lb bag I keep in the freezer*. Stir the mixture a bit, then add about 7 cups of freshly ground flour. If you're using the WhisperMIll or something similar, the flour will be nice and warm which will help activate the yeast quicker. Stir this mixture with a large spoon, or, using the doughhooks, stir until blended in the Bosch.
Let sit for about 15 minutes (longer if you're using cold flour) or until the yeast is bubbly.
Then add 1 1/2 tsp salt (or sea salt) and any spices you like for flavoring in your bread*.
Add at least 7 cups more freshly ground flour and mix thoroughly. Then knead, adding more flour if necessary, until dough is elastic and will pull away from the floured kneading surface or the sides of the Bosch bowl. In the Bosch, this usually takes 7-10 minutes. By hand it takes....longer ;) With experience you'll recognize when it feels and looks 'just right' to stop the kneading.
Grease (or oil) 6 medium sized bread pans (these work better than the large ones and smaller ones work even better) and divide up the dough forming loaves big enough to fill the pan about 1/3 full. Set aside in a warm place to rise.The warmer the flour and the warmer the room, the quicker the rising will be. It usually takes mine about 40 minutes or so since I use warm flour and set it over the water reservoir on my wood cookstove.
When the loaves have doubled in size, place in a 375º oven and bake for 25 minutes. A slower oven will take longer but too slow will cause the dough to 'fall' and you'll have a mess to feed to the chickens (guess how I figured that out!) And too hot will burn the crusts, leaving the inside raw, and you'll still have a fallen mess to feed the chickens.
*I use any one of several brands but Red Star is the most commonly found and works great. I use the 2lb bag found in most grocery stores. I keep it in the freezer because it will store for years beyond the date listed on the package and still works like I just opened the package.
*Cinnamon, ginger, and nutmeg, along with raisins makes a nice cinnamon raisin bread that isn't too sweet. Italian seasonings make a nice flavored bread to go with Spaghetti. Small amounts of kelp can be added for flavoring, too. Just don't add too much as kelp is strong flavored and will overwhelm everything else pretty quickly (guess how I figured that out!)
Yogurt:
Here's how we make our homemade yogurt:
Make sure all containers and utensils are very clean since you don't want to culture a bad bacteria in with your yogurt.
1: Skim off the cream (makes good butter) from 2 gallons of fresh cow's milk.
2: Rinse out a 10 quart pot (stainless steel) with water (using a wet pot prevents the milk layer from sticking to the pan during the scalding). Then scald milk by bringing the temperature up to 180º over a medium fire, stirring well with a wire whip so that it doesn't burn.
3: Let milk cool to about 115º-120ºF. About the time the milk is 125ºF, heat about a quart of water and pour into an ice chest that's big enough to hold your filled yogurt containers. Close lid to preheat the container.
4: When the milk reaches 115º-120º, add about 2 cups of the yogurt* and stir in well. Make sure it's stirred in well so you don't end up with lumps in the bottom, (guess how I figured that out). *I use Mountain High yogurt from the store, when I need a culture, since it seems to set up nicely. The next gfew times you can just use yogurt saved back from this batch. When the finished yogurt starts to taste bigger, time to get a new starter.
5: Pour into 6 or 7 quart containers and place containers into the ice chest. Cover ice chest with a couple of blankets to help keep it warm if the room is cool. Let sit undisturbed in the ice chest for about 5 hours to thicken. Then refrigerate or set outside to cool (as long as it's not too hot or too cold).
6: You can then add sweetening and flavoring if desired and eat.
Whipped cream:
picture coming
If you have enough butter made or just want some whipped cream to go with a bowl of strawberries or pumpkin pie... it's easy to make.
All you do is skim off the cream from a gallon of milk, pour it in a deep bowl, add vanilla and sugar to taste and beat. I have used an electric mixer which takes about 5 minutes or so, but I've also use a wire whisk which takes only a little longer. Beat until fluffy and light and will form soft peaks.
Overwhipping results in a sugary vanilla flavored butter ;)
Spiced Oatmeal Muffins
picture coming
Preheat oven to 400º.
4 c flour
2 Tbsp baking powder
1 tsp salt
2 c sugar (depending on how sweet you like it, honey or other sweetener can be used, just adjust accordingly)
1 Tbsp cinnamon
1 tsp nutmeg
1/2 tsp ginger
2 c quick cooking oatmeal
1 c raisins, optional (I don't add raisins because I don't like them)
Mix the above ingredients in a large mixing bowl, adjusting and/or adding spices according to taste. Leave a 'well' in the center of the mixture.
Mix together in a separate small bowl:
2 eggs
1/2 c oil or melted shortening
2 c milk (I've substituted powdered milk, water, or a combination of both adjusting the amount so that there's enough moisture but not too much)
Pour the egg mixture into the well in the flour mixture and stir till moistened. Don't overstir because the muffin will be 'tough'; just stir until good and moistened.
Spoon into greased muffin tins and bake at 375º for 20-25 minutes. Makes about 18 large muffins.
Lots of different spices can be used for different flavors. Experiment.
Here are just a few suggestions:
For a muffin that is not as sweet, use less sugar (or honey).
Instead of oatmeal, add a cup or 2 of cornmeal and less sweetener.
Mashed ripe bananas or applesauce can be used.
Raisins, craisins, or other dried fruits can be added.
Chocolate or Chocolate Chocolate Muffins
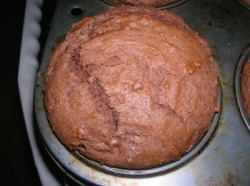
chocolate muffin
4 cups flour
2 tbsp baking powder
1 tsp salt
2 cups sugar
1/2 cup chocolate powder
2 eggs
1/2 cup cooking oil or melted shortening or coconut oil
2 cups milk (powdered milk works, or, if you use water add bit less)
Mix all dry ingredients together in a mixing bowl (you can include the milk powder if using powdered milk, then add the water with the wet ingredients)
Make a well in the center of the dry ingredients and in it, place the eggs, oil, and milk/water. Mix these together in the well, then mix all ingredients together in the bowl. Don't overmix or you'll end up with tough muffins. Bake at 400º for 20 minutes. Makes about 12 large and delicious muffins.
A cup or 2 of chocolate chips can be added to make Chocolate Chocolate Muffins, too. Yummm!
Mom's Chocolate Chip Cookies

chocolate chip cookies
I got this recipe from my mother when hub and I had just married, over 35 years ago. She made these at least twice a week for us kids to take to school in our lunch boxes. And every night we got milk and cookies just before bedtime....yes, it was these cookies. And they are delicious!
4 c flour
2 tsp soda (substituting baking powder works fine)
2 tsp salt
Sift and set aside. (I never sift!)
2 c shortening
2 c sugar
1 c brown sugar
4 eggs
4 tsp vanilla extract
12 oz package chocolate chips
Sift dry ingredients. In separate bowl, cream shortening and both sugars. Add eggs and vanilla. Mix well. Add dry ingredients and mix together. Stir in chocolate chips. Drop by teaspoon into baking sheet.
Bake at 375º for 8-12 minutes or until light golden brown. They will continue to bake for a minute or 2 after removing from oven so adjust your time accordingly.
Hot Cocoa Mix -very simple
picture coming
My hot cocoa mix is very simple with only 3 or 4 ingredients.
Place a half cup of cocoa powder (powdered chocolate can be bought bulk from several different sources) in a quart jar.
Add 2 cups of sugar and a pinch of salt, then put the lid on and shake the jar to mix the ingredients together.
I haven't figured out a way to get vanilla mixed in without it clumping up, so it can be added to your cup. Any other flavoring can also be used. I like orange, daughter likes mint. Only takes a drop or 2. A little cinnamon, allspice, or ginger is good, too.
To use, heat milk over medium heat stirring constantly and vigorously to prevent burning. When hot enough for your taste, put in a couple of tablespoons or so of the hot cocoa mix, also according to your taste. Add flavoring if you so desire.
We also use a bit of cream if we have extra to use up. It makes it that much richer. Yummmm!!!
Store in refrigerator temporarily or freezer for longer term.
|
|
|
