Seed Starting
...Vegetables...
When do I start my garden seeds?
When do I start my seeds indoors? Which seeds need to be started inside? First, determine the length of your growing season by determining your last spring frost and your first fall frost dates. Choose seeds that fit your growing season. Then...Here is a chart that can help you get started --->
This is just a starting point, don't be too legalistic about it. Over time, you'll learn what works and doesn't in your garden. |
For your computer:
To Print and fill in:
| ||||
Wooden seed flats
putting a linseed oil finish on the trays
My husband built some seed starting flats for me that are wonderful! They are made of spruce wood, 3 inches deep, 11 inches wide and 22 inches long. These also double for carrying seedlings in small pots and garden tools ... anything. They're strong enough to handle the weight when loaded with seedlings that have been watered well. And they're easy to repair when necessary.
He also made half trays, the same width and height, but half the length. Which makes it almost square.
These flats/trays are very handy to have! Great surprise for me one day a few years back, when he brought me the 1st 3 new ones.
Click HERE for instructions on building seed trays like these.
He also made half trays, the same width and height, but half the length. Which makes it almost square.
These flats/trays are very handy to have! Great surprise for me one day a few years back, when he brought me the 1st 3 new ones.
Click HERE for instructions on building seed trays like these.
Easy seed starting
Selecting your seeds
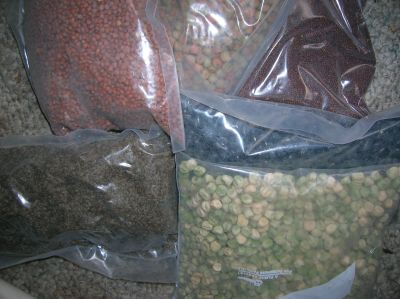
what to plant, what to plant!
Select seed varieties you want to grow, making sure they will mature within the length of your growing season. Determine your last spring frost and first fall frost dates. Knowing your average daytime and nighttime temperatures helps, too, because growing something that needs warm nighttime temps isn't very productive if your nights are too cold.
Check germination temperature requirements. Some seeds, such as lettuce and cabbage need fairly low germination temperatures. Tomatoes and peppers require a higher temperature range.
Check light requirements. Some seeds need light for germination. These are usually slightly covered by the seed starting mix and placed under lights or in a bright window for germination.
Check moisture requirements also. Too little or too much moisture can prevent germination and proper growth.
Below is a list of a few of my favorite companies.
Gathering your tools & supplies

our homemade seed tray (flat)
Here is what I usually use for seed starting in the late winter/early spring:
Seeds that you want to start
Seed trays*
Newspapers
Potting mix (I usually use a commercial mix but you can make your own at home; I will as soon as I can figure out how)
Seed starting mix (soil-less -usually a mixture of peat moss and a few other ingredients)
Clear plastic wrap
Shop lights with "grow bulbs" for plants or Grow lights (this isn't needed till your first seeds have sprouted, then you'll need lighting of some kind)
*I use styrofoam cups for the things that don't like being too disturbed, such as squash, cucumbers, pumpkins, zucchini, melons, etc. Don't forget to poke a hole in the bottom of each cup for drainage. A pencil or nail works good for that. And you don't need the newspaper liner because very little of the soil will leak out through the holes in it.
Getting started
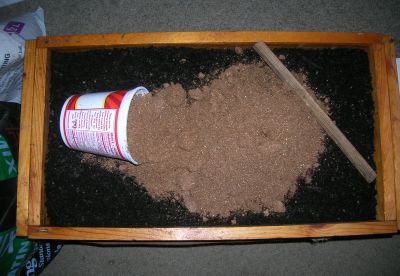
filling the tray with soil and seed starting mix
This is done in layers...
1. Place in the bottom only of the seed tray a couple of layers of newspapers (allows for proper drainage but keeps the soil in the tray where it belongs).
2. Next place about 2 inches of the potting mix spread evenly over the newspapers.
3. Then carefully place about an inch of Seed starting mix over the top of the potting mix smoothing out and being careful not to mix it in with the potting mix underneath.
4. Next thing to do is moisten, again being careful not to wash away the seed starting mix. I usually place them in the shower with the movable head, adjust the water temperature to lukewarm and spray carefully and keep the shower head moving. I have also used a watering can with the holes... and even an old coffee can with nail holes punched in the bottom of it. Let the tray drain a few minutes so that it's not soggy.
5. Plant the seeds according to the directions on the seed packets paying attention to planting depth, temperature, and spacing. It is better if you use the same variety through the whole tray but if you need to mix them, make sure everything in the tray has the same needs and the same germination times.
6. Cut a piece of clear plastic wrap just longer than the tray and spread it out over the top of the newly planted seeds, keep moist and watch for sprouting. When you see the 1st sprouting, place the tray under the grow lights, and remove the plastic wrap to avoid damping off disease. Make sure you maintain the right amount of moisture at this point; moist but not soggy. And when you add water, do it gently so as not to wash away the newly sprouted seedlings. I usually use a spray bottle at this point, until the seedlings get big enough to not wash away. Maintain good air circulation as this will help avoid damping off disease. Thin, if necessary, but proper spacing will avoid too much waste. Proper spacing makes it easier to remove the seedlings when it's time to transplant, too.
Here are the seed companies I do business with nearly every year:
Heirloom Acres Seeds -This is the company I order the most from currently. They have a great selection of heirloom and open pollinated seeds and the best prices I've seen for the larger packets. Based in Missouri.
Baker's Seeds -This company also specializes in heirloom and open pollinated seeds with the best selection anywhere! They used to have the best prices on the larger packets but they seem to be moving away from that. Based in Missouri. Seeds Trust/High Altitude Gardens -I have done business with this company since the mid 80s. They have some tomato and pepper varieties that I haven't been able to find anywhere else. They specialize in cold climate growing and their seeds reflect that. I have had their seeds out-perform many others in our cold climate. Family operation was based in high mountains of Southern Idaho, but moved to Arizona for his father's health. |
Here are some outfits that I do business with on a fairly regular basis:Johnny's Selected Seeds -They've been around for years and have a great selection of seeds. Both hybrid and some OP. Based in Maine
Pinetree Garden Seeds -If you want to try out a variety of seeds before you buy a large amount of them, these folk have a decent supply in small packets. Small prices to match. OP and hybrid. Based in Maine Nichol's Garden Nursery -Based in Oregon Bountiful Gardens -Specializes in sustainable growing. OP and heirloom seeds available. By the author of one of the best books on gardening available "How to Grow More Vegetables..." |
For more information......
There are a number of good books on starting seeds, and gardening in general. I have some HERE in my store.
Saving seedsThe next step is saving seeds of the best plants you've grown for next garden season or to share with someone else. Here is a file that explains the basics of seed saving.
|
| ||
